本文将向您详细介绍将消息推送服务接入 iOS 客户端的接入流程。
前提条件
您已将工程接入到 mPaaS。更多信息,请参见以下内容:
操作步骤
要使用消息推送服务,您需要完成以下接入步骤:
添加消息推送 SDK。
根据您接入 mPaaS 采用的接入方式,添加消息推送 SDK。
在接入 mPaaS 的三种接入方式中,均可以添加消息推送 SDK。
当采用 基于 mPaaS 框架接入 或 基于已有工程且使用 mPaaS 插件接入 的接入方式时,在编辑工程页面,选择 Push(消息推送),即可添加消息推送 SDK,完成消息推送 SDK 接入。
当采用 基于已有工程且使用 CocoaPods 接入 的接入方式时,在 Podfile 文件中,使用
mPaaS_pod "mPaaS_Push"添加消息推送组件依赖,然后执行pod install完成消息推送 SDK 接入。
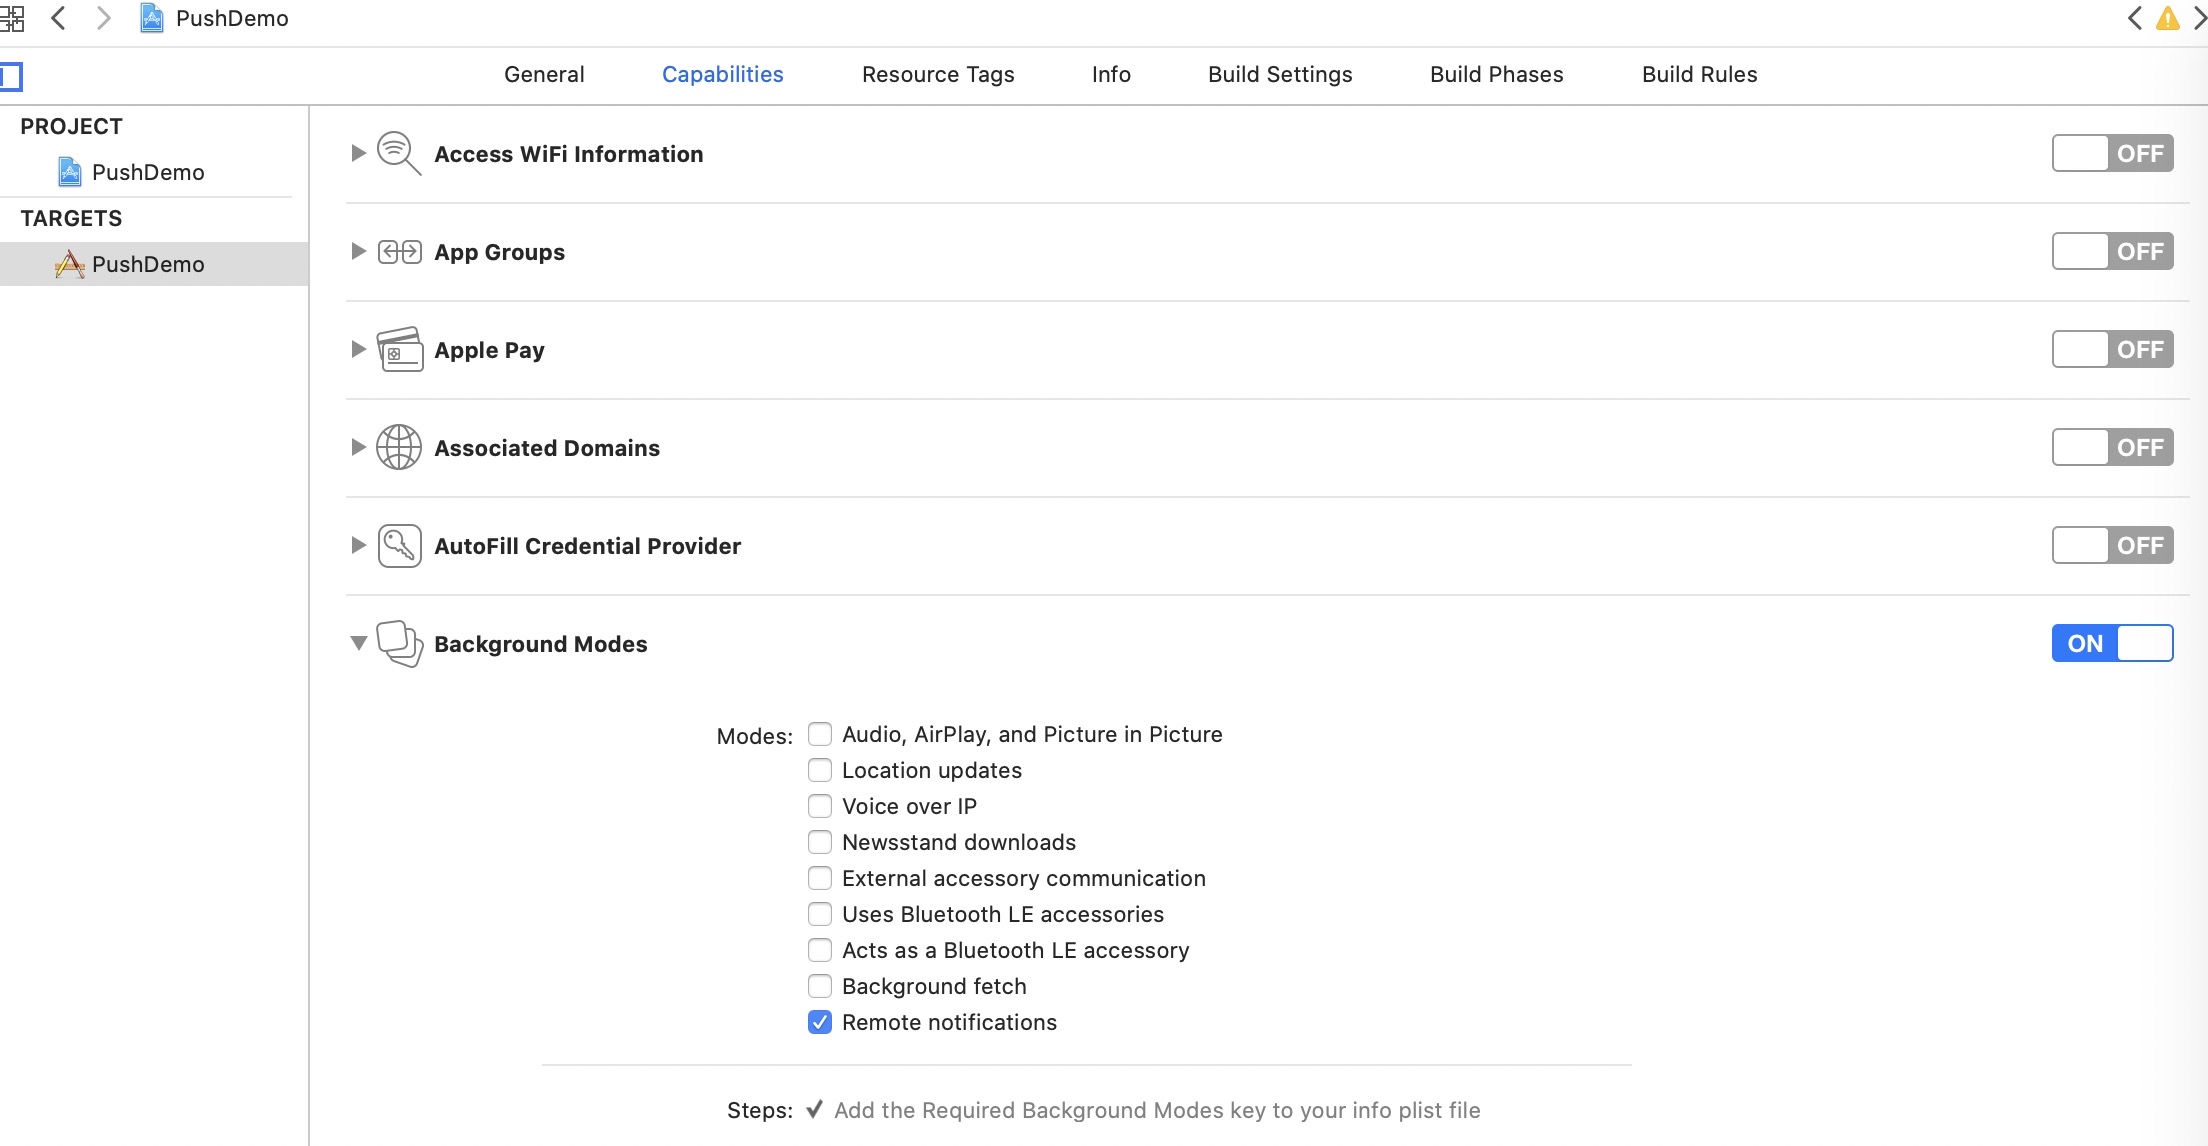
配置工程。需要在工程的 TARGETS 设置中开启以下两项配置:
Capabilities > Push Notifications
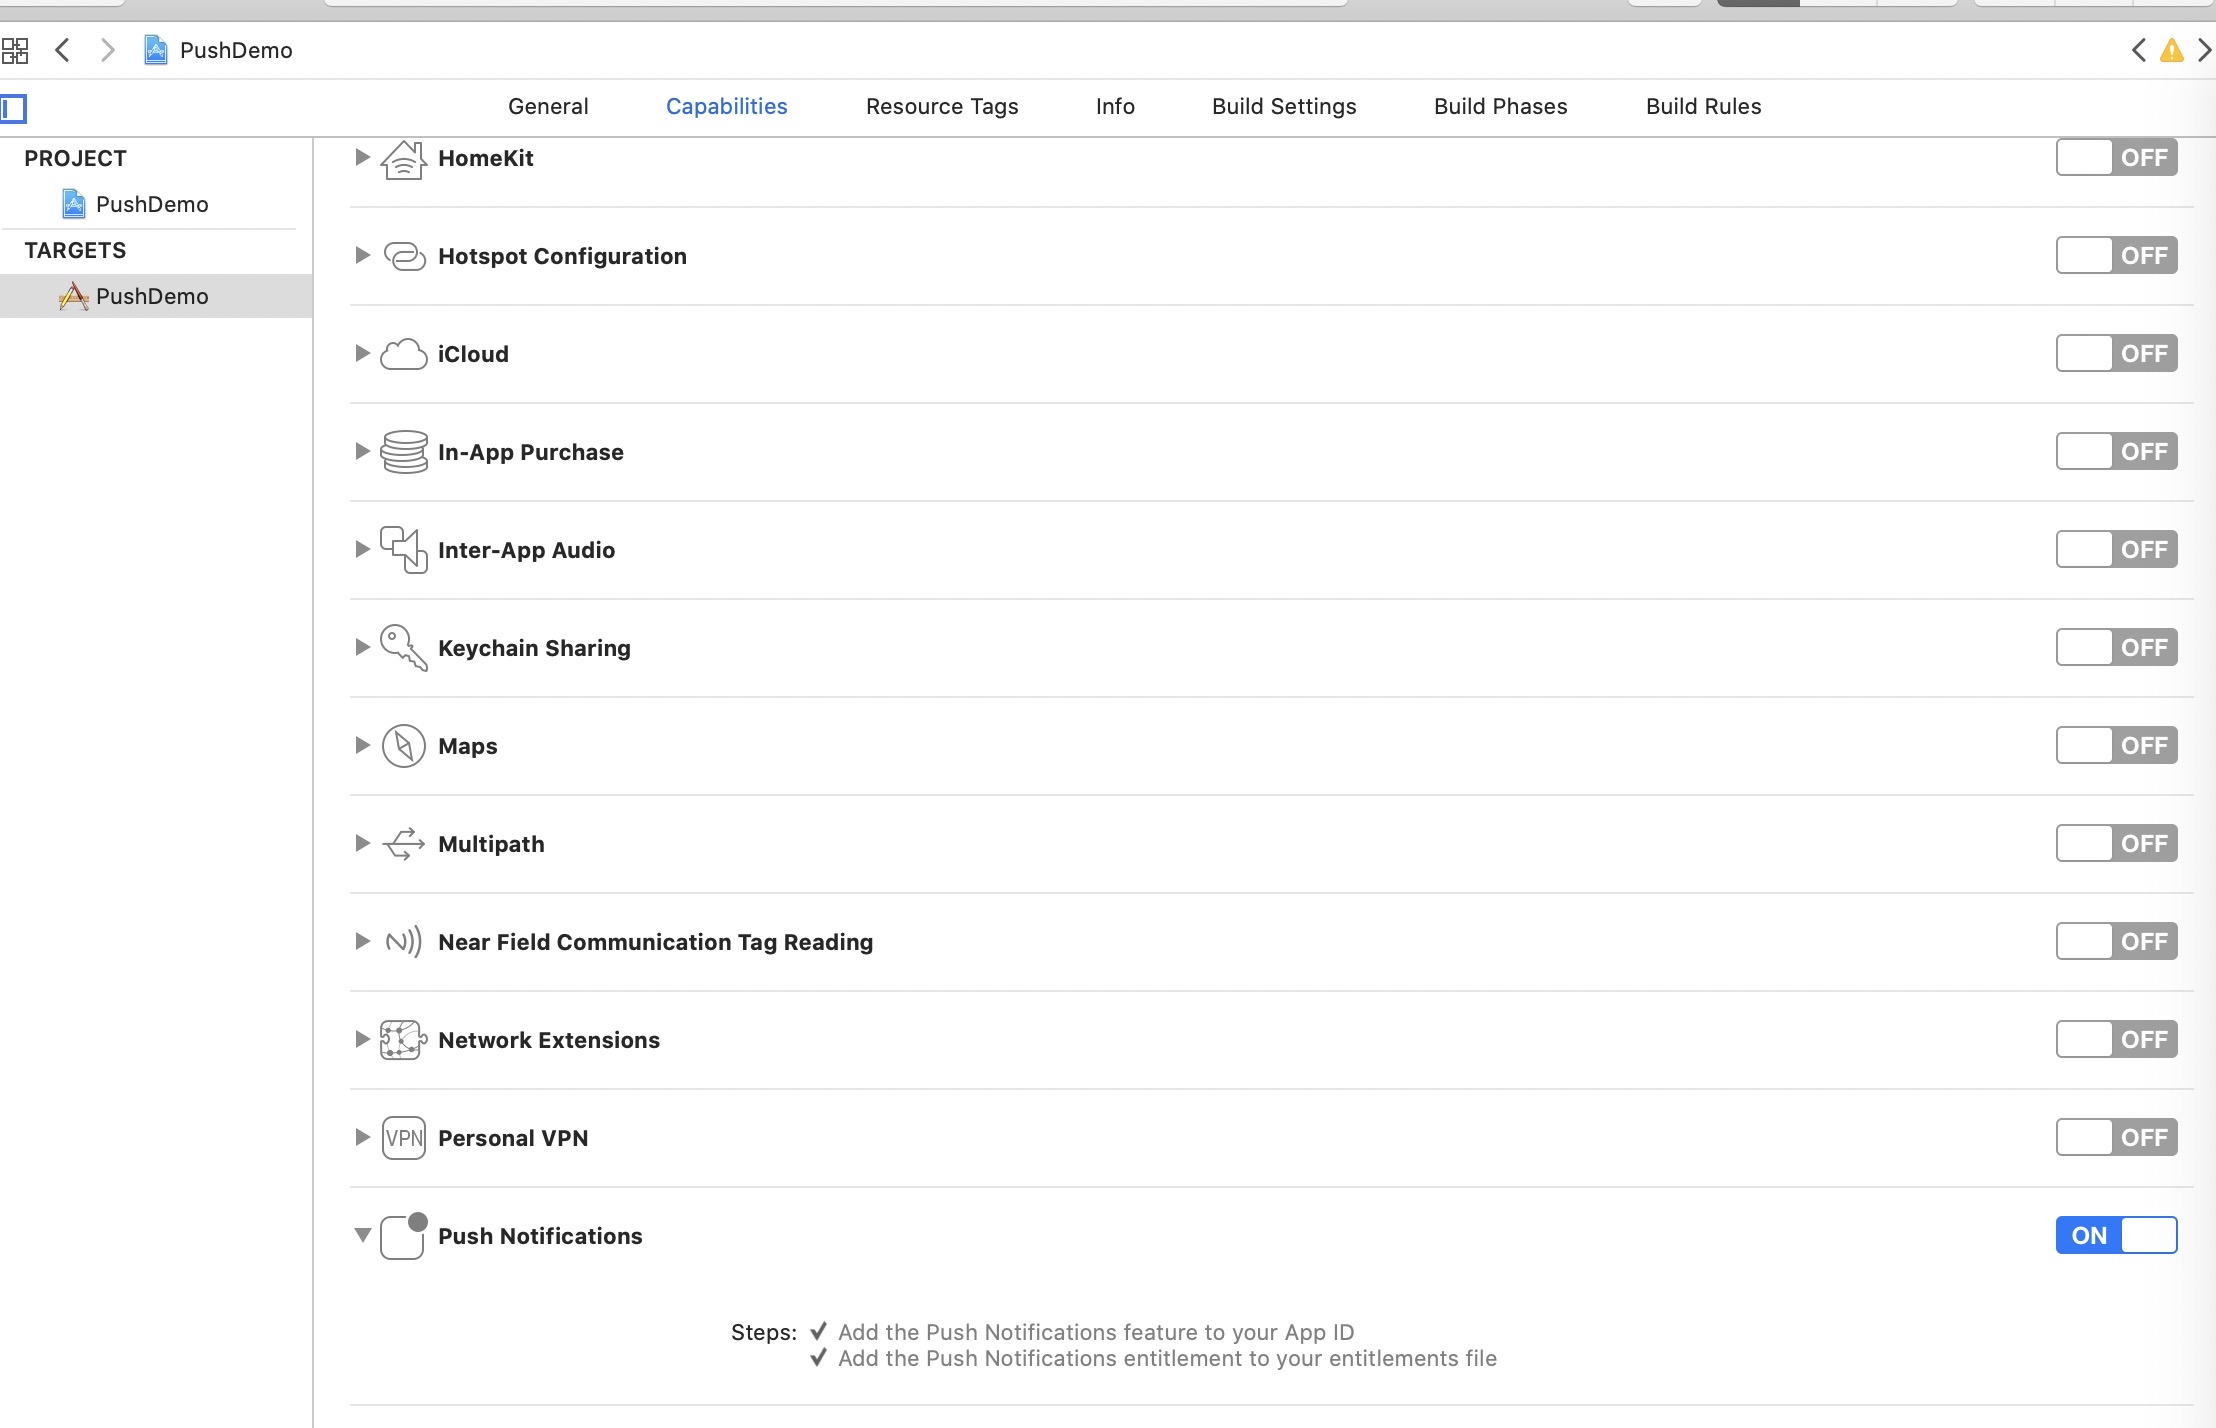
Capabilities > Background Modes > Remote notifications
使用 SDK。下面对不同接入方式的 SDK 使用进行说明。
基于 mPaaS 框架接入
注册 deviceToken(非必需)。
消息推送 SDK 在应用启动完成时,会自动请求注册 deviceToken,一般情况下您无需请求注册 deviceToken。但是当特殊情况下(比如启动时有隐私管控,阻止一切网络请求时)您需要在管控授权后,再次触发注册 deviceToken,示例代码如下:
- (void)registerRemoteNotification
{
    // 注册推送
    if ([[[UIDevice currentDevice] systemVersion] floatValue] >= 10.0) {// 10.0+
        UNUserNotificationCenter* center = [UNUserNotificationCenter currentNotificationCenter];
        center.delegate = self;
        [center getNotificationSettingsWithCompletionHandler:^(UNNotificationSettings * _Nonnull settings) {

                [center requestAuthorizationWithOptions:(UNAuthorizationOptionAlert|UNAuthorizationOptionSound|UNAuthorizationOptionBadge)
                                      completionHandler:^(BOOL granted, NSError * _Nullable error) {
                    // Enable or disable features based on authorization.
                    if (granted) {
                        dispatch_async(dispatch_get_main_queue(), ^{
                            [[UIApplication sharedApplication] registerForRemoteNotifications];
                        });
                    }
                }];

        }];
    } else {// 8.0,9.0
        UIUserNotificationSettings *settings = [UIUserNotificationSettings settingsForTypes:(UIUserNotificationTypeBadge                                                                                         |UIUserNotificationTypeSound|UIUserNotificationTypeAlert) categories:nil];
        [[UIApplication sharedApplication] registerUserNotificationSettings:settings];
        [[UIApplication sharedApplication] registerForRemoteNotifications];
    }
}
获取 deviceToken 并绑定 userId。
与基于 iOS 原生框架相比,基于 mPaaS 框架的应用的生命周期被 mPaaS 框架接管,应用获取 deviceToken 的回调方法有所不同,代码示例如下:
// import <PushService/PushService.h> // 在 DTFrameworkInterface 分类中重写如下方法 - (DTFrameworkCallbackResult)application:(UIApplication *)application didRegisterForRemoteNotificationsWithDeviceToken:(NSData *)deviceToken { [[PushService sharedService] setDeviceToken:deviceToken]; [[PushService sharedService] pushBindWithUserId:@"your userid(需替换)" completion:^(NSException *error) { }]; return DTFrameworkCallbackResultContinue; }说明消息推送 SDK 同时提供了解绑的接口
- (void)pushUnBindWithUserId:(NSString *)userId completion:(void (^)(NSException *error))completion;,用于解除设备的 deviceToken 与当前应用的 userId 的绑定。如在用户切换账号后,可以调用解绑接口。绑定用户手机号。
重要目前,仅杭州非金融区提供短信补充服务。
将 deviceToken 和用户的手机号码绑定。绑定手机号码后,用户就可以通过该手机号码收到相关推送短信。
// 若在绑定接口上传手机号码,则可以使用短信补充服务
- (void)pushBindWithUserId:(NSString *)userId phoneNumber:(NSString *)phoneNumber completion:(void (^)(NSException *error))completion;
接收推送的消息。
基于 mPaaS iOS 框架的应用,由于其生命周期被 mPaaS 框架接管,与基于 iOS 原生框架相比,收到消息的回调方法不同,代码示例如下:
// import <PushService/PushService.h>
// 在 DTFrameworkInterface 分类中重写如下方法
- (DTFrameworkCallbackResult)application:(UIApplication *)application didReceiveRemoteNotification:(NSDictionary *)userInfo fetchCompletionHandler:(void (^)(UIBackgroundFetchResult))completionHandler
{
    // userInfo 为推送消息内容,业务解析处理
    return DTFrameworkCallbackResultContinue;
}
统计消息的打开率。
为了统计消息在客户端的打开率,您需要在 App 消息被用户打开时,调用
PushService的pushOpenLogReport接口(10.1.32 及以上版本可用)上报消息打开事件。该事件上报后,您可以在 mPaaS 控制台中的 消息推送 > 概览 页面中查看消息打开率的统计数据。/** * 打开推送消息的上报接口,用于统计推送消息的打开率 * @param userInfo 消息的 userInfo * @return */ - (void)pushOpenLogReport:(NSDictionary *)userInfo;
基于已有工程接入
在基于已有工程且使用 mPaaS 插件或 CocoaPods 接入 iOS 客户端的情况下,您需要完成以下操作。
注册 deviceToken(非必需)。
消息推送 SDK 在应用启动完成时,会自动请求注册 deviceToken,一般情况下您无需请求注册 deviceToken。但是当特殊情况下(比如启动时有隐私管控,阻止一切网络请求时)您需要在管控授权后,再次触发注册 deviceToken,示例代码如下:
- (void)registerRemoteNotification
{
    // 注册推送
    if ([[[UIDevice currentDevice] systemVersion] floatValue] >= 10.0) {// 10.0+
        UNUserNotificationCenter* center = [UNUserNotificationCenter currentNotificationCenter];
        center.delegate = self;
        [center getNotificationSettingsWithCompletionHandler:^(UNNotificationSettings * _Nonnull settings) {

                [center requestAuthorizationWithOptions:(UNAuthorizationOptionAlert|UNAuthorizationOptionSound|UNAuthorizationOptionBadge)
                                      completionHandler:^(BOOL granted, NSError * _Nullable error) {
                    // Enable or disable features based on authorization.
                    if (granted) {
                        dispatch_async(dispatch_get_main_queue(), ^{
                            [[UIApplication sharedApplication] registerForRemoteNotifications];
                        });
                    }
                }];

        }];
    } else {// 8.0,9.0
        UIUserNotificationSettings *settings = [UIUserNotificationSettings settingsForTypes:(UIUserNotificationTypeBadge                                                                                         |UIUserNotificationTypeSound|UIUserNotificationTypeAlert) categories:nil];
        [[UIApplication sharedApplication] registerUserNotificationSettings:settings];
        [[UIApplication sharedApplication] registerForRemoteNotifications];
    }
}
获取 deviceToken 并绑定 userId。
mPaaS 提供的消息推送 SDK 中封装了向 APNs 服务器注册的逻辑,在程序启动后,Push SDK 自动向 APNs 服务器注册。您可在注册成功的回调方法中获取 APNs 下发的 deviceToken,然后调用
PushService的接口方法,上报绑定 userId 至移动推送核心。// import <PushService/PushService.h> - (void)application:(UIApplication *)application didRegisterForRemoteNotificationsWithDeviceToken:(NSData *)deviceToken { [[PushService sharedService] setDeviceToken:deviceToken]; [[PushService sharedService] pushBindWithUserId:@"your userid(需替换)" completion:^(NSException *error) { }]; }消息推送 SDK 同时提供了解绑的接口
- (void)pushUnBindWithUserId:(NSString *)userId completion:(void (^)(NSException *error))completion;,用于解除设备的 deviceToken 与当前应用的 userId 的绑定。如在用户切换账号后,可以调用解绑接口。绑定用户手机号。
重要目前,仅杭州非金融区提供短信补充服务。
将 deviceToken 和用户的手机号码绑定。绑定手机号码后,用户就可以通过该手机号码收到相关推送短信。
// 若在绑定接口上传手机号码,则可以使用短信补充服务
- (void)pushBindWithUserId:(NSString *)userId phoneNumber:(NSString *)phoneNumber completion:(void (^)
接收推送的消息。
客户端收到推送的消息后,如果用户点击查看,系统将启动相应应用。可在
AppDelegate的回调方法中完成收到 push 消息后的逻辑处理。在 iOS 10 以下系统中,通知栏消息或静默消息的处理方法如下:
  // iOS 10 以下 Push 冷启动处理
  - (BOOL)application:(UIApplication *)application didFinishLaunchingWithOptions:(NSDictionary *)launchOptions {
  NSDictionary *userInfo = [launchOptions objectForKey: UIApplicationLaunchOptionsRemoteNotificationKey];
  if ([[[UIDevice currentDevice] systemVersion] doubleValue] < 10.0) {
      // iOS 10 以下 Push 冷启动处理
  }

  return YES;
}

  // App 在前台时,普通推送的处理方法;App 在前台或后台时,静默推送的处理方法;iOS 10 以下系统,通知栏消息处理方法
  - (void)application:(UIApplication *)application didReceiveRemoteNotification:(NSDictionary *)userInfo fetchCompletionHandler:(void (^)(UIBackgroundFetchResult result))completionHandler
  {
      //处理接受到的消息
  }
在 iOS 10 及以上系统中,您需要实现以下代理方法来监听通知栏消息:
  // 注册 UNUserNotificationCenter delegate
  if ([[[UIDevice currentDevice] systemVersion] doubleValue] >= 10.0) {
          UNUserNotificationCenter* center = [UNUserNotificationCenter currentNotificationCenter];
          center.delegate = self;
    }

   //应用处于前台时的远程推送接收
  - (void)userNotificationCenter:(UNUserNotificationCenter *)center willPresentNotification:(UNNotification *)notification withCompletionHandler:(void (^)(UNNotificationPresentationOptions options))completionHandler
  {
      NSDictionary *userInfo = notification.request.content.userInfo;

      if([notification.request.trigger isKindOfClass:[UNPushNotificationTrigger class]]) {
          //应用处于前台时的远程推送接收

      } else {
          //应用处于前台时的本地推送接收

      }
      completionHandler(UNNotificationPresentationOptionNone);
  }

  //应用处于后台或者活冷启动时远程推送接收
  - (void)userNotificationCenter:(UNUserNotificationCenter *)center didReceiveNotificationResponse:(UNNotificationResponse *)response withCompletionHandler:(void(^)(void))completionHandler
  {
      NSDictionary *userInfo = response.notification.request.content.userInfo;

      if([response.notification.request.trigger isKindOfClass:[UNPushNotificationTrigger class]]) {
          //应用处于后台或者活冷启动时远程推送接收

      } else {
          //应用处于前台时的本地推送接收

      }
      completionHandler();

  }
统计消息的打开率。
基于已有工程统计消息打开率的操作方法和基于 mPaaS 框架完全相同。
配置推送证书。
要使用 mPaaS 消息推送控制台推送消息,您需要在控制台中配置 APNs 推送证书。该证书必须是与客户端签名对应的推送证书,否则客户端会收不到推送消息。有关详细的配置说明,查看 配置 iOS 推送通道。
后续操作
在 mPaaS 消息推送控制台配置完 APNs 证书后,可以按设备维度向应用推送消息。消息推送服务使用苹果的 APNs 服务向客户端推送消息,更多信息请参见 苹果及国外安卓设备推送流程。
上报用户 ID 并由服务端绑定用户和设备后,可以按用户维度向应用推送消息。
代码示例
点击此处 下载示例代码包。
相关链接
Live Activity 消息推送
iOS 在 16.1 版本中推出了一个新功能:Live Activity(实时活动)。该功能可以将实时活动展示在锁屏界面上,帮助用户从锁定的屏幕实时获知各种活动的进展。在主工程中,可以使用 ActivityKit 框架来开启、更新、结束实时活动。其中,更新和结束实时活动还可以使用远程推送来实现。在 widget extension 中,可以使用 SwiftUI 和 WidgetKit 来创建 Live Activity 的界面。其中,Live Activity 远程推送更新功能,不支持 .p12 证书,因此需要用户配置 .p8 证书。
同一个项目中可以同时开启多个 Live Activity,不同的 Live Activity,其 token 是不同的。
Live Activity 苹果官方文档
Live Activity 使用限制
只能在 iOS 16.1 版本以上的系统上运行。
只支持 iPhone 设备,不支持 iPadOS,macOS,tvOS,watchOS。
单个 Live Activity 最多可运行 8 个小时,超过 8 小时系统会自动停止 Live Activity 的运行,但是不会立即从屏幕上被移除。
停止运行超过 4 小时后系统会自动将其从屏幕上移除。
资源文件尺寸需符合要求,详情请参见 苹果开发者文档。
推送的内容不能超过 4KB。
接入客户端
配置工程支持 Live Activity
在主工程的
Info.plist文件中添加一个键值对,key 为NSSupportsLiveActivities,值为YES。
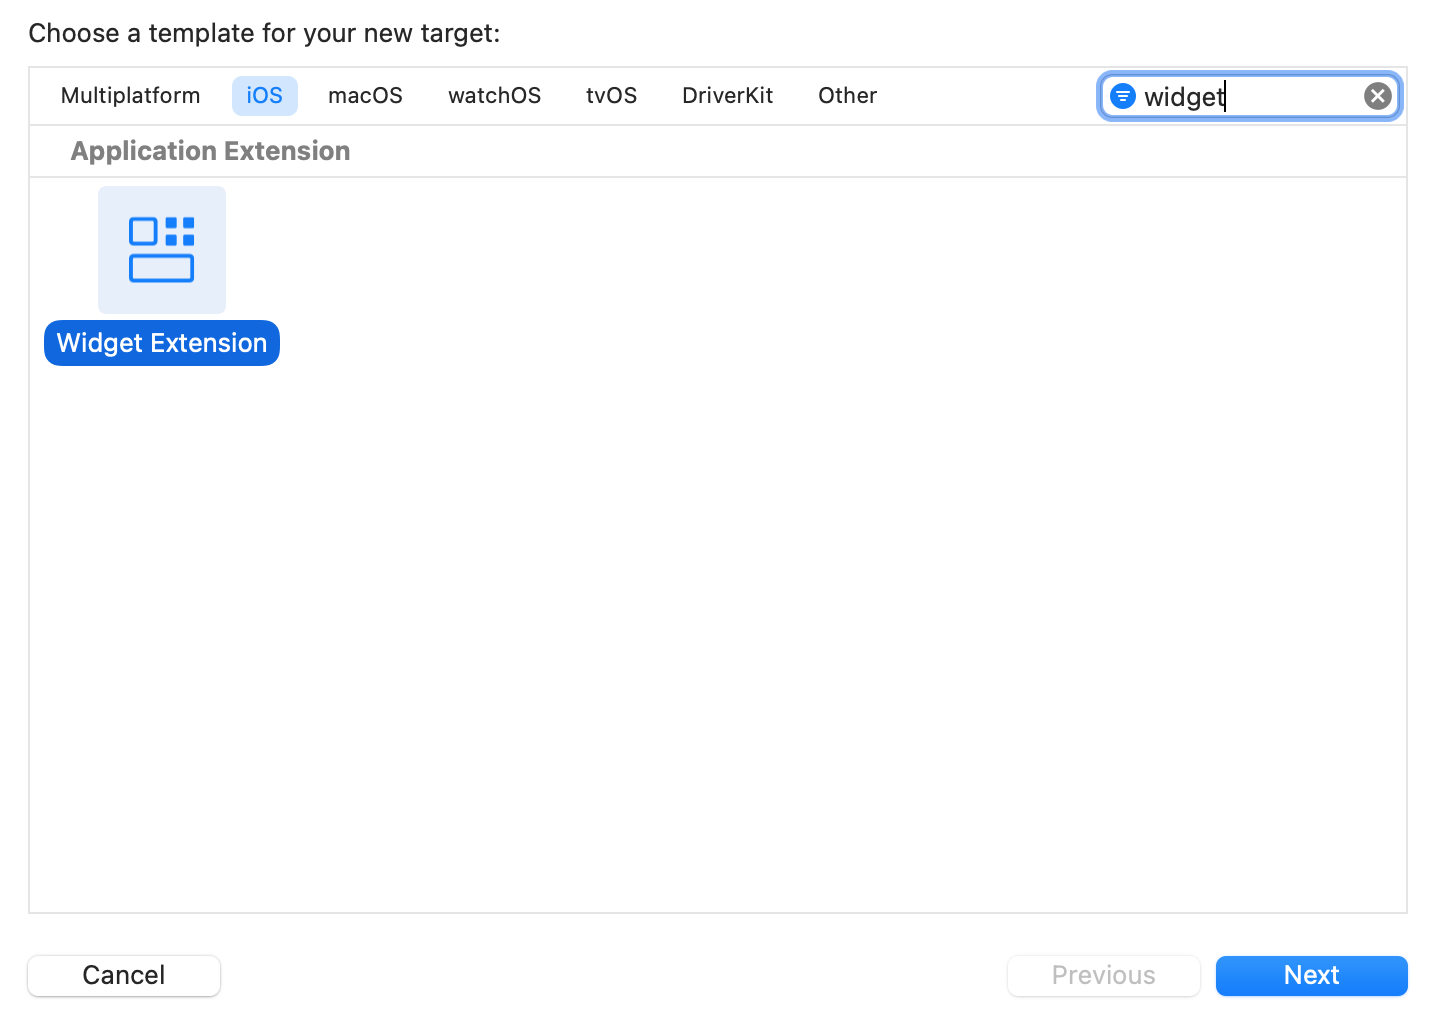
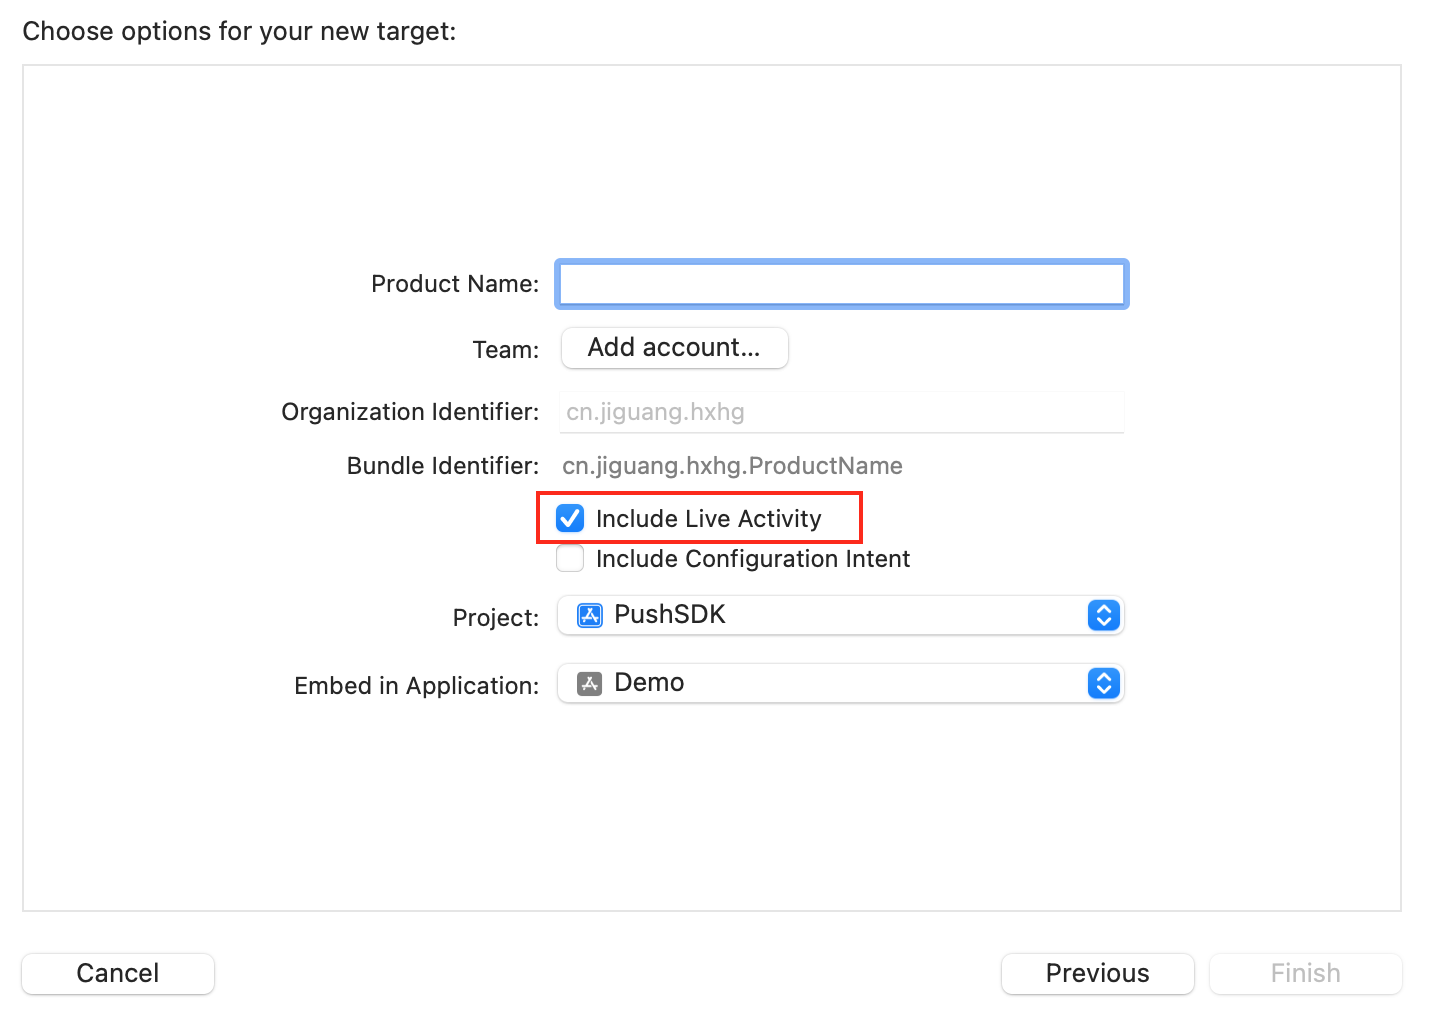
新建 Widget Extension,如果项目中已有,可跳过此步骤。
代码实现
创建 model。
在主工程代码里新建一个 swift 文件,在其中定义
ActivityAttributes以及Activity.ContentState。以下代码为示例代码,请按照实际业务编写。
import SwiftUI
import ActivityKit

struct PizzaDeliveryAttributes: ActivityAttributes {
    public typealias PizzaDeliveryStatus = ContentState

    public struct ContentState: Codable, Hashable {
        var driverName: String
        var estimatedDeliveryTime: ClosedRange<Date>

        init(driverName: String, estimatedDeliveryTime: ClosedRange<Date>) {
            self.driverName = driverName
            self.estimatedDeliveryTime = estimatedDeliveryTime
        }
        init(from decoder: Decoder) throws {
            let container: KeyedDecodingContainer<PizzaDeliveryAttributes.ContentState.CodingKeys> = try decoder.container(keyedBy: PizzaDeliveryAttributes.ContentState.CodingKeys.self)
            self.driverName = try container.decode(String.self, forKey: PizzaDeliveryAttributes.ContentState.CodingKeys.driverName)
            if let deliveryTime = try? container.decode(TimeInterval.self, forKey: PizzaDeliveryAttributes.ContentState.CodingKeys.estimatedDeliveryTime) {
                self.estimatedDeliveryTime = Date()...Date().addingTimeInterval(deliveryTime * 60)
            } else if let deliveryTime = try? container.decode(String.self, forKey: PizzaDeliveryAttributes.ContentState.CodingKeys.estimatedDeliveryTime) {
                self.estimatedDeliveryTime = Date()...Date().addingTimeInterval(TimeInterval.init(deliveryTime)! * 60)
            } else {
                self.estimatedDeliveryTime = try container.decode(ClosedRange<Date>.self, forKey: PizzaDeliveryAttributes.ContentState.CodingKeys.estimatedDeliveryTime)
            }
        }
    }

    var numberOfPizzas: Int
    var totalAmount: String
}
主工程 target 和 Activity 都要选上。
收到的推送消息由系统处理,开发者不能拦截。
ContentState中为可以动态更新的数据,推送 Live Activity 通知时,动态更新的参数名和类型要和ContentState里配置的对应上。如果有些数据需要经过加工,需要重写
ActivityAttributes.ContentState的decoder方法。
创建界面。
在 Widget Extension 中创建实时活动的界面。创建 Widget 并返回一个
Activity Configuration。具体 UI 请按照自己的业务编写。
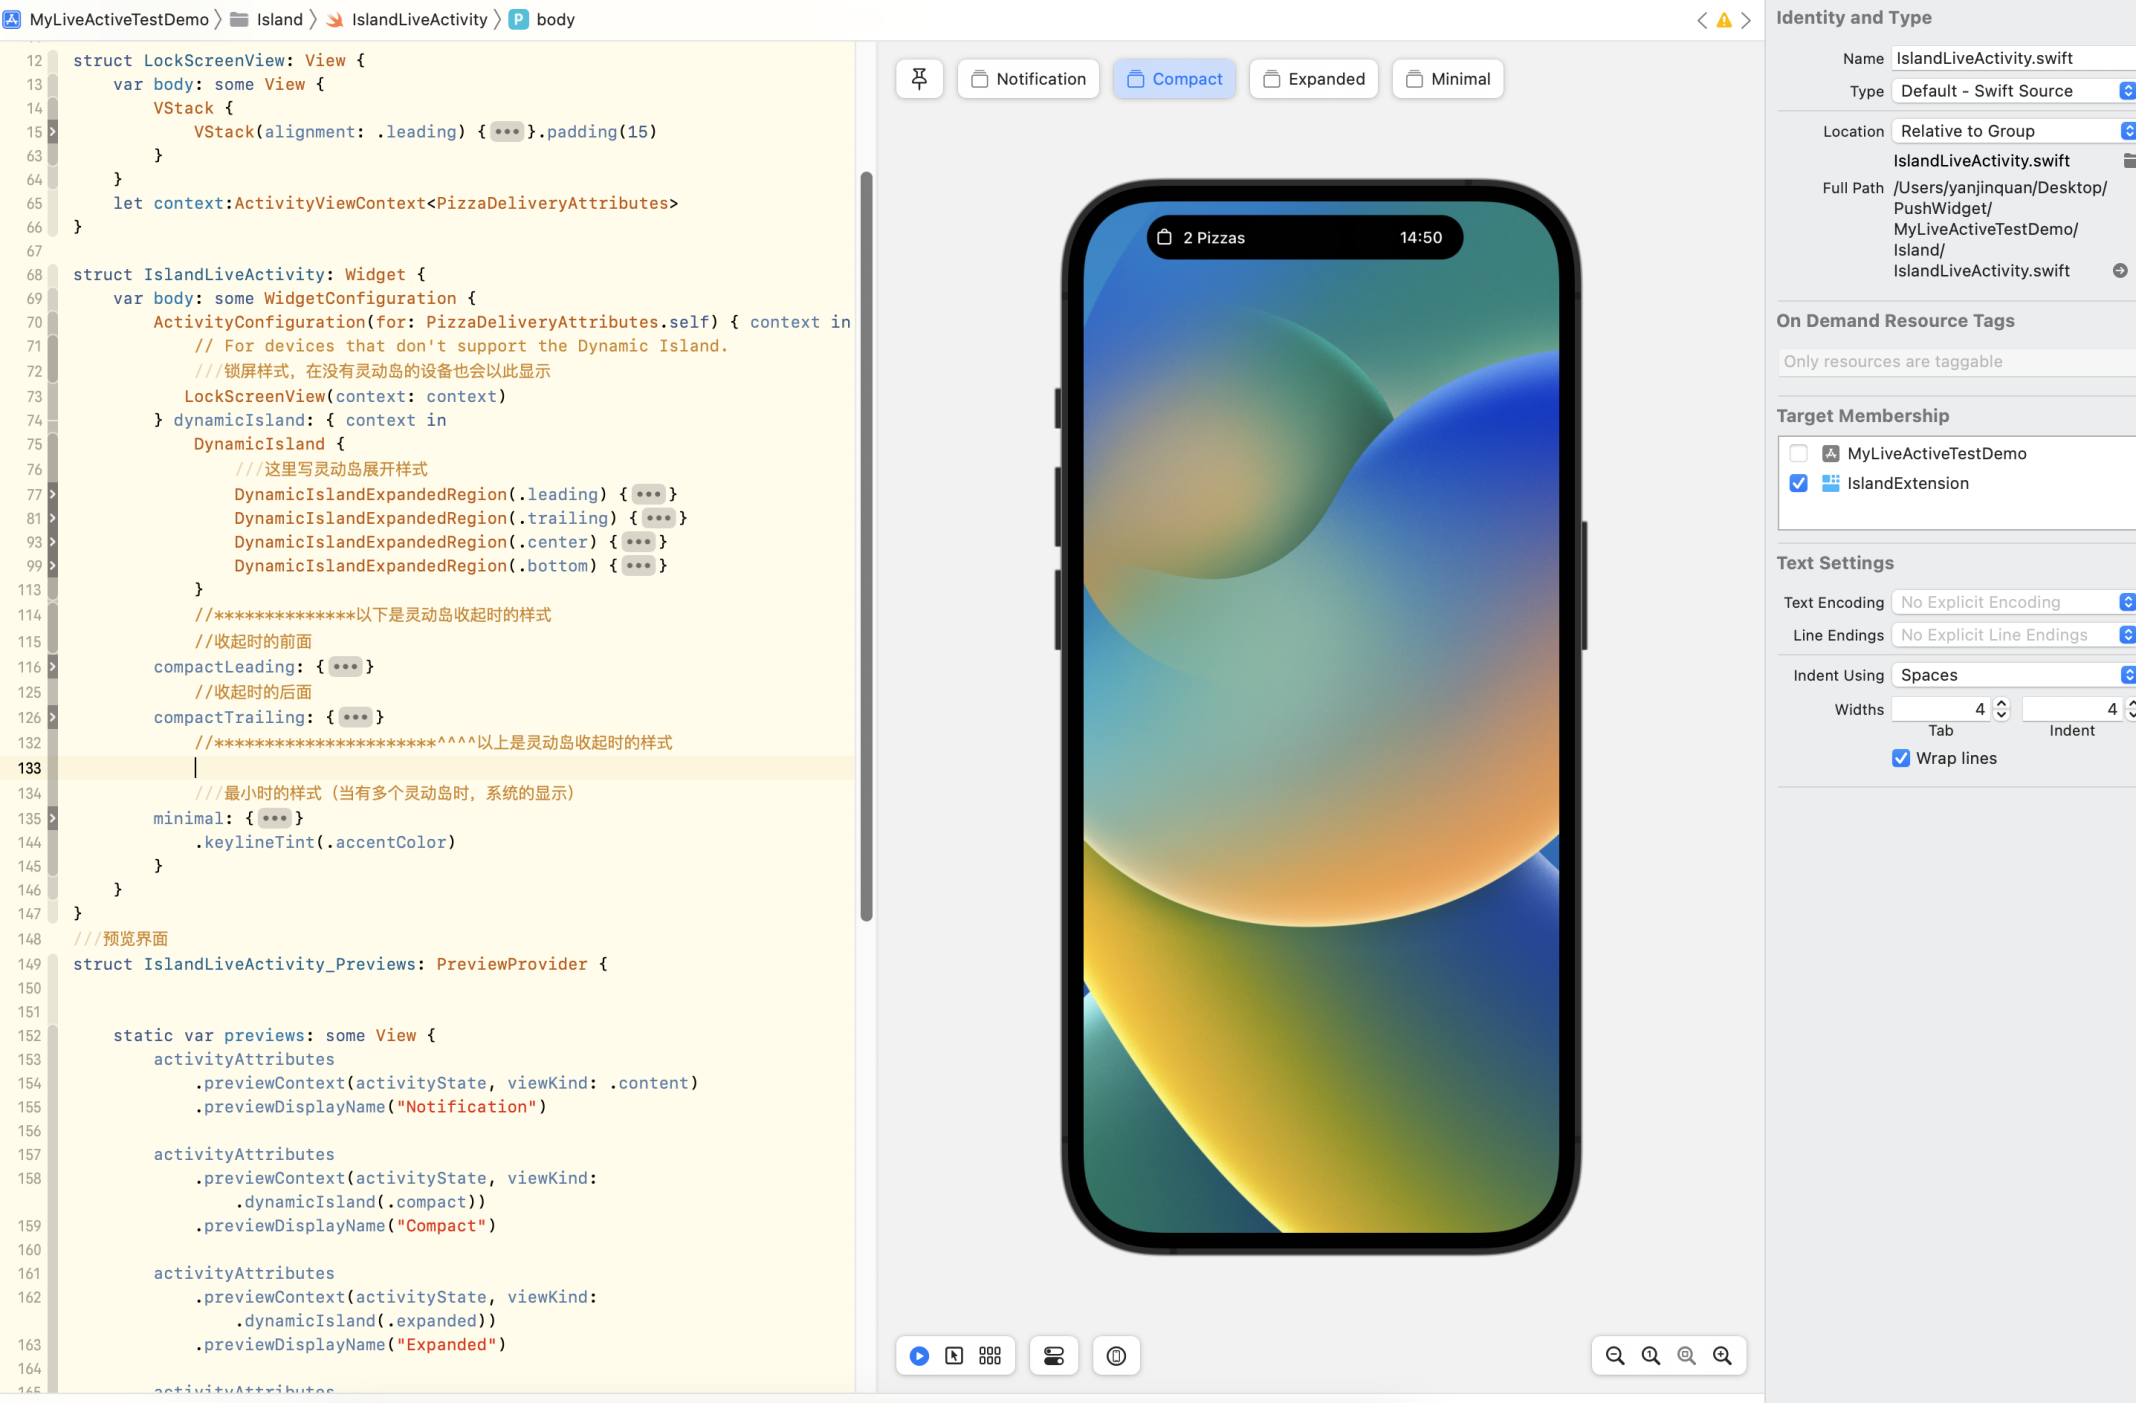
使用 WidgetBundle。
如果目标 App 既支持小组件也支持实时活动,请使用 WidgetBundle。
import WidgetKit
import SwiftUI

@main
structIslandBundle: WidgetBundle {
varbody: someWidget {
Island()
IslandLiveActivity()
}
}
开启实时活动。
func startDeliveryPizza() {
    let pizzaDeliveryAttributes = PizzaDeliveryAttributes(numberOfPizzas: 1, totalAmount:"$99")
    let initialContentState = PizzaDeliveryAttributes.PizzaDeliveryStatus(driverName: "TIM", estimatedDeliveryTime: Date()...Date().addingTimeInterval(15 * 60))
    do {
        let deliveryActivity = try Activity<PizzaDeliveryAttributes>.request(
            attributes: pizzaDeliveryAttributes,
            contentState: initialContentState,
            pushType: .token)
    } catch (let error) {
        print("Error requesting pizza delivery Live Activity \(error.localizedDescription)")
    }
}
提交 Token。
开启实时活动成功后,通过
pushTokenUpdates方法拿到系统返回的 Live Activity 的推送 Token。 调用 PushService 的liveActivityBindWithActivityId:pushToken:filter:completion:方法上报。在上报 Token 的同时,需要将该实时活动的标识一起上报。实时活动推送时需要用到该标识,服务器根据该标识确认推送目标。该实时活动的标识请自定义,不同 Live Activity,其 id 不同(如果唯一会导致推送出现问题),同一个 Live Activity,在 Token 更新时不要更换 id。
说明ActivityKit 为 swift 语言框架,且不支持直接 OC 调用,使用该框架 API 的时候,请在 swift 文件里面调用。由于 MPPushSDK 是 OC 语言,涉及到 swift 调用 OC,需要创建桥接文件。并在桥接文件里导入:
#import <MPPushSDK/MPPushSDK.h>。let liveactivityId = UserDefaults.standard.string(forKey: "pushTokenUpdates_id") ?? "defloutliveactivityId" Task { for await tokenData in deliveryActivity.pushTokenUpdates { let newToken = tokenData.map { String(format: "%02x", $0) }.joined() PushService.shared().liveActivityBind(withActivityId: liveactivityId, pushToken: newToken, filter: .call) { excpt in guard let excpt = excpt else { ///上报成功 return } if "callRepeat" == excpt.reason { ///重复调用,请忽略 print("pushTokenUpdates_id——重复调用") } else { ///上报失败 } } } }上报成功后,则可以使用实时活动的标识推送更新。
说明由于 iPhone 的
pushTokenUpdates会同时被调用两次,即在多个 Live Activity 的场景中,新创建 Live Activity 时之前的LiveActivity pushTokenUpdates又会被重新唤醒一次,所以 SDK 提供了过滤功能,并由参数 filter 控制:filter 为
MPPushServiceLiveActivityFilterAbandon时,SDK 会自动直接抛弃重复的调用,不给回调。filter 为
MPPushServiceLiveActivityFilterCall时,SDK 会自动过滤掉本次请求,给失败回调(callRepeat),此时error.reason为@"callRepeat",请忽略。filter 为
MPPushServiceLiveActivityFilterReRefuse时,SDK 内部不做过滤。重复地调用相同的 activityId,相同的 pushToken 时,如果上报失败,客户端重新上报不会被认为是相同的调用。
下面是
MPPushServiceLiveActivityFilterType的定义:typedef NS_ENUM(NSInteger, MPPushServiceLiveActivityFilterType){ MPPushServiceLiveActivityFilterAbandon,//直接抛弃,不给回调 MPPushServiceLiveActivityFilterCall,//过滤掉本次请求,给失败回调(callRepeat) MPPushServiceLiveActivityFilterRefuse//不做过滤 };
- 本页导读 (0)